How to Make a Bank Transfer in Sage 100

When you need to transfer funds from an account for any reason, such as to cover payroll or add to a sweep account, you can move money from one bank code/account to another in Sage 100. To make this transfer in the General Ledger module, you need to do a transaction journal entry. If you also own Bank Reconciliation, this action will take effect simultaneously in both modules.
Here’s how to make a bank transfer in Sage 100:
Part 1
Transaction Journal Entry: Header Tab
Go to: General Ledger | Main | Transaction Journal Entry
On the Transaction Journal Entry screen, choose the tab “1. Header” (Image 1)

Instructions by Field—
Source Journal:
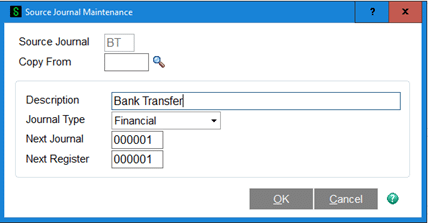
Enter the code you wish to use for the Bank Transfer. “BT” for example.
Note: If this is a new source journal you will be prompted create it. Set the description as desired and Journal type to “Financial” and click OK
Entry Number:
Click the pound sign icon to the right of the blank field, and the next available entry number will appear.
Part 2
Transaction Journal Format
If you have not previously defined the format or would like to change it, click “Format” (Image 3).
If you have already formatted the journal, your previous Transaction Journal Format settings will pull into the entry and populate the fields appropriately.
In the Transaction Journal Format screen, fill out the information as applicable.
Header Defaults Section—
Offset Account No.:
Enter the main General Ledger account number that corresponds with the transaction type.
Description:
Do nothing. This text will pull through from Account Maintenance. It cannot be changed.
Offset:
Using the drop-down menu, select the type of action to apply to the account indicated by the Offset Account Number. For example: “Credit.”
Line Fields Section—
Transaction Total:
Check this option to be given a place to key in a grand total for the transaction. Items feeding into this number may include bank transfer, deposit and withdrawals.
Transaction Type:
Using the drop-down menu, select the type of transaction, such as a bank transfer, deposit, withdrawal, or check number. The chosen type will determine the next set of fields available to enter on the Transaction Journal Entry Lines tab. For this example, choose “Bank Transfer”
Auto Increment Check Number:
If the transaction type is “check number,” this option will become available. Select this option to increment the check number with each line of the transaction. Deselect to manually enter each check number.
Bank Reconciliation Fields—
Post Deposits in Summary:
Only applicable if using the “Deposit” Transaction type. Make this selection to post all of the deposits as a single transaction in the Bank Reconciliation Module.* Deselect to post all deposit transactions as separate entries in the Bank Reconciliation Module.
*If you choose to post in summary, the deposit date will pull from the header tab (and not from each line).
Bank Code:
Enter the bank code tied to the transaction, for the bank from which the funds will be sent. Or, enter the bank code associated with the Offset account.
Transfer Funds to Bank Code:
Enter the code for the default bank account that will receive the funds.
Select “OK” to accept the formatting selections. This will return you to the Transaction Journal Entry screen, tab “1. Header” (Image 1).
Complete Part 1.
Back on the Transaction Journal Entry screen, “1. Header” tab, next to “Posting Date,” type today’s date or click the daily flip calendar icon to make a selection.
On the bottom-right of the screen, to the right of the words, “Transfer No.” enter the transfer number. This is a required field. Your bank should provide you with a transfer/transaction number. If not, use the six-digit date (MMDDYY) Ex. 121615.
Verify the source code information pulled in from the format screen.
Part 3
Transaction Journal Entry: Lines Tab
Go to the Transaction Journal Entry screen. Select the “2. Lines” tab.
On line 1, verify the information that has been pulled into the entry (Posting Date, Bank Code, GL Account Number, etc.).
Lines Tab Fields—
Doc. Refer.:
Enter a reference number for the transaction. (This may be a combination of letters and numbers.)
Amount:
Enter the dollar amount to transfer.
Comment:
In this space, provide a description or other details that will be helpful to you.
When you are satisfied with the transaction entries, click “Accept.”
Print and update the journal.
You’re finished!