How to Inactivate Customers and Vendors in Sage 100

If you are no longer doing business with a particular customer or vendor, or for any other reason do not wish to post transactions for that company in Sage 100 (version 2013 or later), you may deactivate their records. Since active status allows you to exchange money, if you wish to make a payment to an inactive vendor or receive funds from an inactive customer, you will need to change the role security setting.
To prevent hassles such as the need to backtrack and alter settings, before the system allows you to officially deactivate a customer or vendor, it checks for open orders, repetitive invoices, and any assignments to items or jobs. If any of these conditions exist, they must be expedited before proceeding.
Step 1
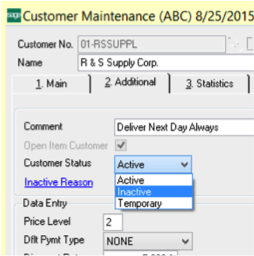
In Sage 100, go to the Customer Maintenance (Image 1) or Vendor Maintenance module, as applicable.

Image 1
Click on the “Additional” tab. Under Customer Status/Vendor Status, select “Inactive.”
Step 2
If the system finds a reason a Customer/Vendor cannot be changed to inactive, you will receive a dialog box (Image 2). To view the explanation, click “Details.”

Image 2
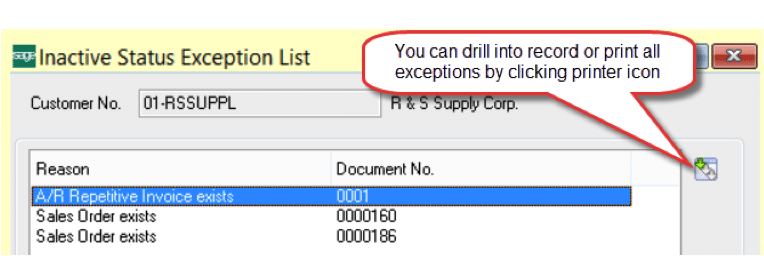
You will be brought to the “Inactive Status Exception List” screen (Image 3).

Image 3
Step 3
If the Customer/Vendor has open invoices (Image 4), you can still make them inactive. However, as mentioned above, you’ll need a security event to process a payment to/from an inactive vendor/customer.

Image 4
Select “Yes.”
Step 4
You’ll be taken to the Customer Maintenance screen (Image 5). If you choose to proceed, change the status to “Inactive.”

Image 5
Step 5
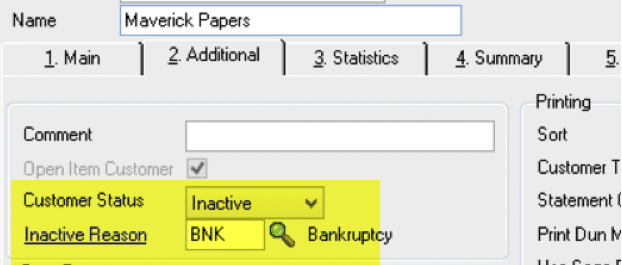
Here, you can also assign a reason for the inactivity, such as bankruptcy. Click the magnifying glass for a list of options and codes (Image 6).

Image 6
Step 6
Click “Accept.” The record now has a status of “Inactive” and cannot be used to process data entry.
Find More Sage 100 Tips & Resources


