Sage Intacct Report Writer: Create a Custom Report

Although there are 150 Sage Intacct built-in reports, on occasion you may not find one that provides the exact parameters you need. Not to worry, though, because Sage Intacct has user-friendly and extremely flexible tools to create your own interactive custom reports. Gone are the days when the only way to get a customized report was to call on a system administrator to build it for you. The other option used to be relying on external tools, many of which didn’t integrate well, so the data may have been inaccurate, as it was not always gathered in real-time.
Why create a custom report for complex reporting needs?
We like being able to drill down to a transaction detail level right in Sage Intacct. This lets a user review any discrepancies or variances in the report without needing to separately log into the ERP system to do so. Additionally, the interactive custom reports feature allows users to create and manage custom reports with advanced functionalities, enhancing financial and operational data reporting.
Whether you start from scratch and use the Financial Report Writer or make a copy of an existing report and modify it, General Ledger accounts or any Dimensions defined in the system can be set as rows, making it possible to gather data on any of the metrics important to your business. You decide which data to populate in the rows and columns, set computations such as variance percentages, and determine filters and formatting. In addition, your administrators can control which users or user groups can access the report. You can also leverage other functionality in Sage Intacct such as account groups and reporting periods, and rely on that set-up to create rows and/or columns without having to list out every individual element each time you need to create a new report.
Introduction to Interactive Custom Report Writer
The Sage Intacct Interactive Custom Report Writer is a powerful tool designed to meet the complex reporting needs of businesses across a variety of industries. This visual reporting tool enables users to create custom reports with ease, providing a modern and powerful approach to financial and operational reporting. With the Interactive Custom Report Writer, users can create even the most complex reports, leveraging advanced analytical tools to make informed decisions. Whether you need to drill down into transaction details or generate high-level summaries, this tool offers the flexibility and precision required to tailor reports to your specific business requirements.
Key Features and Capabilities
Sage Intacct reporting offers a range of key features and capabilities that empower users to create highly customized reports. These include:
- Calculated Columns: Utilize date, calendar, and math functions to create dynamic and insightful columns.
- Rolling Sums and Aggregations: Summarize data over rolling periods to track trends and performance.
- Conditional Logic: Implement if/then statements to add intelligence and flexibility to your reports.
- Pivot Tables: Reorganize and summarize data in columns and rows for better analysis.
- Interactive Elements: Drill, pivot, filter, sort, prompt, and expand reports to answer specific business questions.
- Real-Time Reporting: Access up-to-the-minute insights with real-time reporting capabilities.
These features provide a high degree of control and flexibility, enabling users to tailor reports to their specific needs and gain valuable insights from their data.
How to create a custom report using the interactive custom report writer in Sage Intacct
Interactive custom reports can be used to create detailed and customized reports, enhancing your ability to manage and analyze financial and operational data. We will use this example to show you how to create your custom report: Top Ten Customers’ Month-to-Date Sales and Year-to-Date Sales.
Step 1
In Sage Intacct, go to Reports and select “Financial Report Writer.”
Step 2
Go to the “Report Info” section (Image 1).
Report name:
Here, type a name that identifies the specific parameters of the report, for your reference.
Check the box before the phrase, “This report is active.”
Report structure:
Select the data you would like to view on the left side, in rows, versus that which will appear in columns.
- Choose “Accounts” to position the account data on the left side, in rows.
- Choose “Dimensions” to populate the rows with one of your dimensions.
In our example, we selected “Dimensions,” to list customers in the report rows.
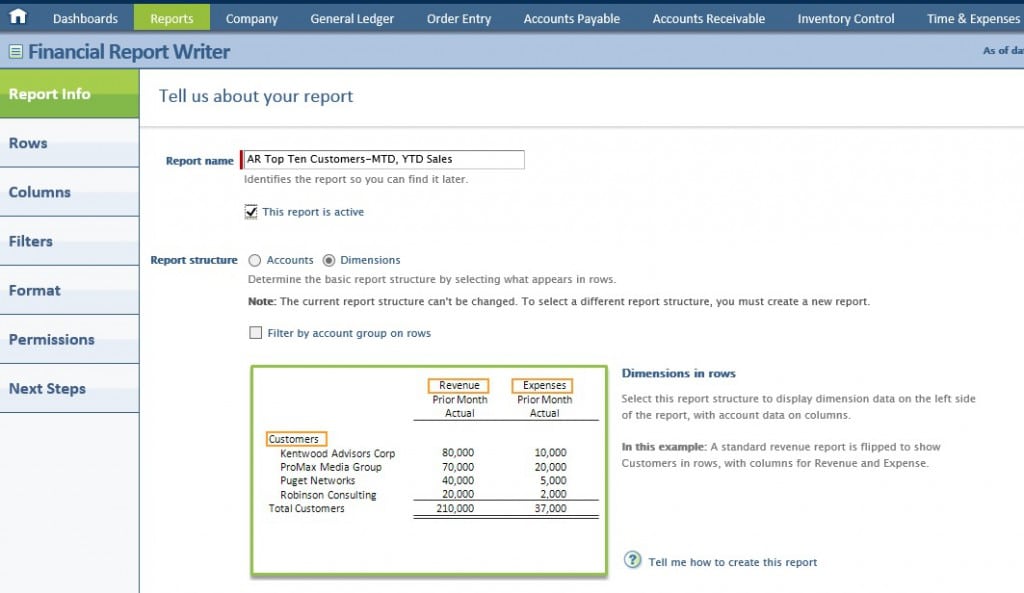
Image 1
Step 3
Go to the “Rows” section (Image 2).
Under “Row Structure,” click the “Select dimension structures” button.
Select the dimension structure to show on the reports. In this case, we chose “Top Ten Customers.”
You can also define additional dimension structures for added reporting flexibility.
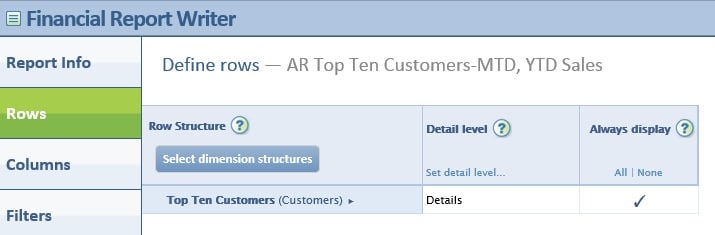
Image 2
Step 4
Go to the “Columns” section (Image 3).
Here, you may set titles, display options, and parameters for each column you would like to see in your report. Make selections for the following options:
Dimensions—
Here is where you choose which data to include, so you won’t have to view extraneous information.
Display—
Customize the way data is shown, including color scheme and highlights,
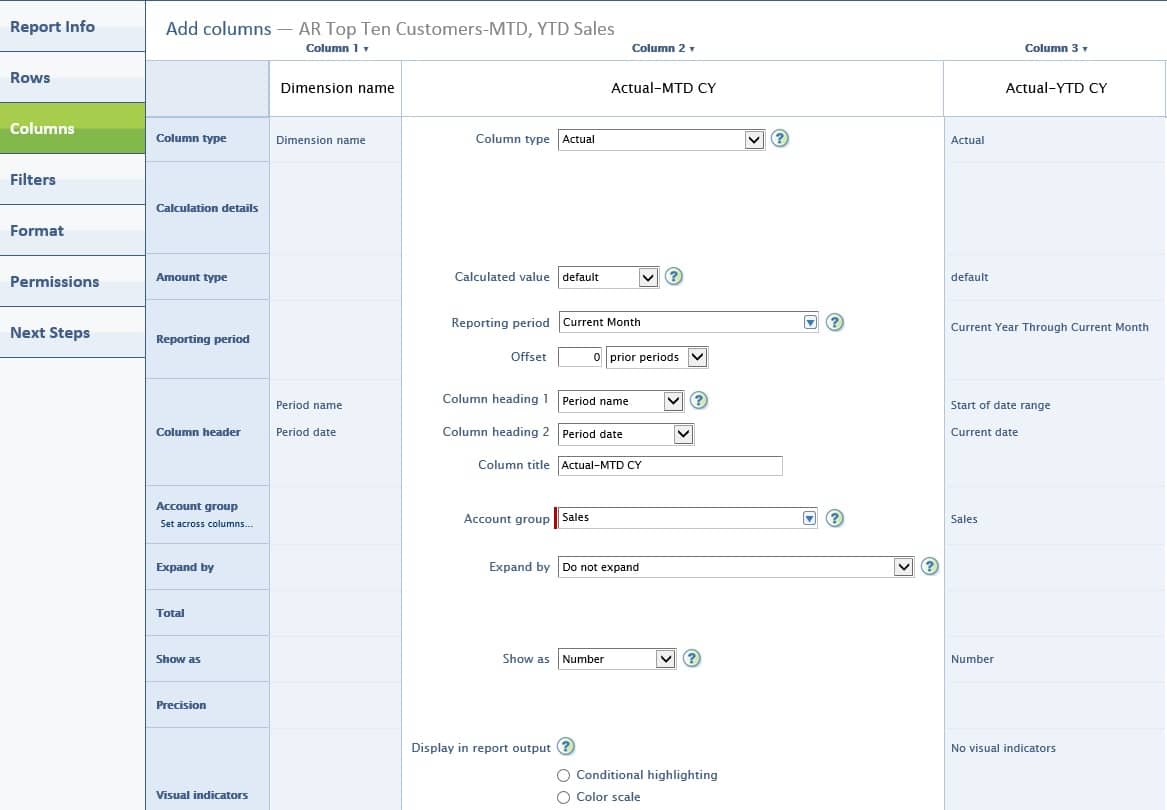
Image 3
Step 5
Go to the “Filters” section (Image 4).
Set any filters to further restrict the data that will show on the report.
Select the “As of Date.”
Define Dimension Filters—
Indicate specific categories or choose “All.” In our example, these are the presented options:
Department, Location, Project, Customer, Vendor, Employee, Item, Class and User Defined Dimensions
You may also indicate if you’d like to “hide inactive” (customers), and whether or not to run individual reports for your chosen department(s) and location(s).

Image 4
Step 6
Go to the “Format” section (Image 5).
This is where you choose how to format the report for display on screen and in print.
Go to the “General” tab:
- Indicate if you’d like to copy formatting from an existing report, and if so, which one.
- Set display preferences for numbers.
Under dimensions, choose how to display departments, locations, and all others, and indicate if you’d like to sort these categories alphabetically.
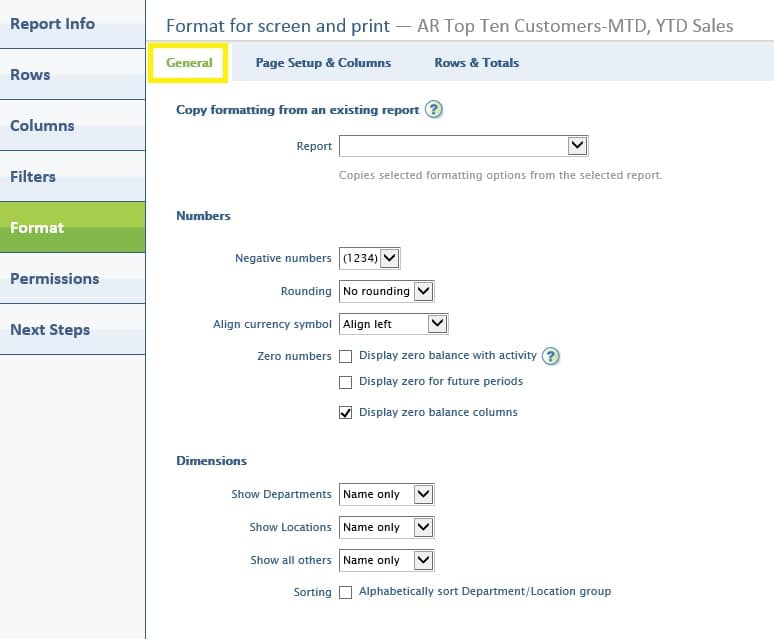
Image 5
Go to the “Page Set-up & Columns” tab (Image 6):
- Indicate page header preferences (whether or not to use a logo, report title, subtitles, title comment, and whether or not to display departments/locations as individual report titles).
- Input page footer text and other preferences.
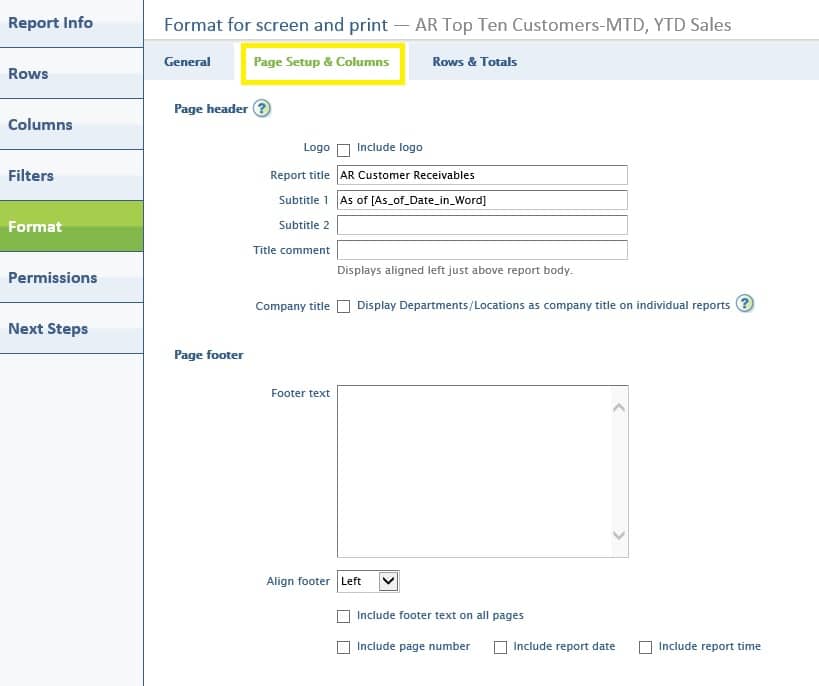
Image 6
Go to the “Rows & Totals” tab (Image 7):
Define rows: Indicate preferences for row formatting, total formatting and currency.
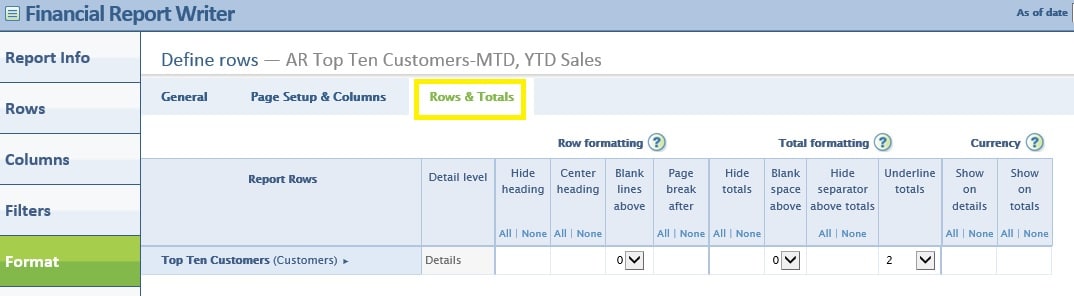
Image 7
Step 7
Go to the “Permissions” tab (Image 8).
Here, you can add or edit the access list and exclusion list, setting permissions by user or group.
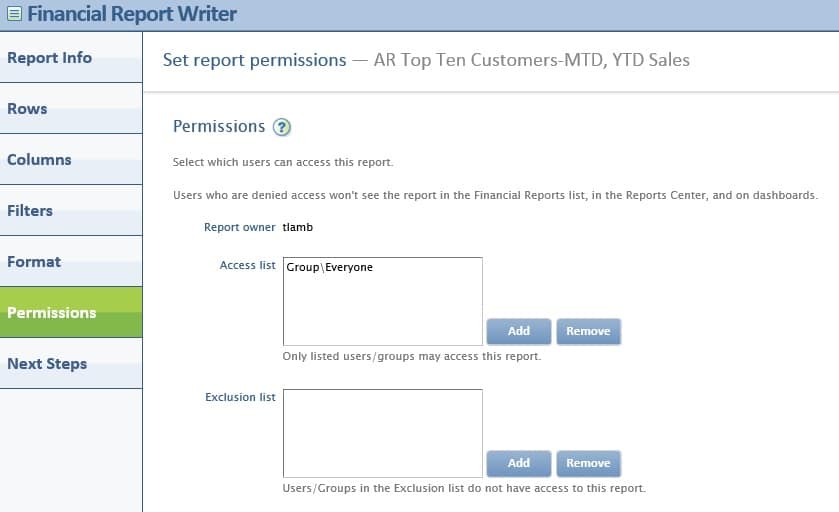
Image 8
Step 8
Go to the “Next Steps” tab (Image 9).
You’re almost done!
Here, you can set the report to “Active” if you did not do so in Step 1.
Click on the hyperlinks to do the following actions:
- Add the report to your “My Favorites” list in the Reports Center.
- Add the report to a dashboard.
- Schedule the report to run periodically.
- Include the report in a report group.
Lastly, once you have defined the rows and columns, you may preview the report at any time. This can be very useful, as it allows you to make changes while you are creating the report rather than waiting until after you have saved and run the report, then having to go back to make modifications. This added efficiency can be extremely beneficial in creating your reports.

Image 9
Once you are satisfied with the report, click the “Save” button. Now, it will now be available to view in your Reports List.
Best Practices for Custom Reporting
To maximize the benefits of the Sage Intacct Interactive Custom Report Writer, it’s essential to follow best practices for custom reporting. These include:
- Defining Clear Objectives: Establish clear reporting objectives and requirements to guide the report creation process.
- Using Calculated Columns: Create dynamic reports by incorporating calculated columns and math functions.
- Leveraging Conditional Logic: Add intelligence to your reports with conditional logic and if/then statements.
- Utilizing Pivot Tables: Reorganize and summarize data effectively using pivot tables.
- Testing and Validating: Regularly test and validate reports to ensure accuracy and data integrity.
By adhering to these best practices, users can create custom reports that provide valuable insights and support informed decision-making.
Getting Help and Support
If you need help or support with the Sage Intacct Interactive Custom Report Writer, there are several resources available to assist you:
- Sage Intacct Partner Support: Contact MicroAccounting for expert guidance and support on using the Interactive Custom Report Writer.
- Online Resources: Access a wealth of online resources, including user guides, tutorials, and webinars, to learn more about the tool.
- Community Forums: Join community forums to connect with other Sage Intacct users and experts, and get answers to your questions.
By leveraging these resources, you can get the help and support you need to create custom reports that meet your specific business needs, ensuring you make the most of the powerful capabilities of the Sage Intacct Interactive Custom Report Writer.
In Sage Intacct, you can provide faster and more detailed operational and financial data based on the dimensions you design and use to get superior reporting power with ease.