Deleting Inventory Items in Sage 100

Much like sifting through a clutter-filled attic, obsolete data can bog down the process of searching for relevant info. If your inventory list is a mix of active and obsolete items, it can cause confusion and potentially data inaccuracies as users try to find the correct item to use.
Deleting inventory items in Sage 100 can seem daunting when dealing with large amounts of data. Here are some tips to help simplify the process. Note that this tip applies to Sage 100 versions 2023 through 2013 and (MAS90) v4.5.
Disclaimer: Perform any modifications to your system at your own risk. By performing any of the steps in our tips or trick articles such as this one, you agree that there is a certain degree of risk associated with altering your system and agree not to hold MicroAccounting responsible if any alterations adversely affect your system. Read all instructions completely before performing any of the steps. If you have any modifications to your system, contact your reseller for assistance. If you have any reservations about making changes to your system, contact your reseller for assistance.
Can I use the “Delete” button and skip reading the rest of this post?
The “Delete” button is only available if a listed inventory item was never used in any transaction. This includes sales orders, purchase orders, return merchandise authorization orders, work orders/work tickets, and inventory transactions
How does the “Delete and Change Items” utility work?
This utility allows the end user to delete or change an item that has been used in a previous order by entering its product name or code. It is important to note that this utility changes the item code in all of the relevant open and history tables. The item description will remain untouched but the item code will change.
Deleting the item, even with this utility, is usually not a good idea because there can be history records associated with the item that are left behind. These orphaned records can cause errors during processing and reporting in Sage 100.
So, what can we do?
Workaround
To resolve this issue, we use the “Delete and Change Items” utility to merge all the unwanted items into one (or more) inventory item. We usually create an item like “ZZZOBSOLETEFIFO” so that the item falls to the bottom of the item lists and is easy to filter off of reports and lookups.
It is important to consider the valuation for the items being merged. Items can only be merged into an item of the same valuation. When looking to delete items with mismatching valuations, merge items with like valuations into several dummy items.
Make a Backup First
Before making any significant database changes make a full database backup and verify that the backup is viable. Take this step even if you are only intending to run this utility in a test company.
Run in a Test Company
Before running the “Delete and Change Items” utility in a live company, it is very important to first do this in a test company. This will ensure the desired result can be achieved. Also, it enables you to find out how much time is required. Planning alert: Depending on the number of items, the process could take as long as 24 hours to complete.
Demo
First, make sure the quantity of all items you wish to delete is zero. Then merge them all into a single item. The utility is found in Modules > Inventory Management > Utilities > Delete and Change Items. This utility is controlled by security so if you receive the message that you are not authorized, someone else with more database rights will need to either run the utility or grant you rights to run it for yourself.
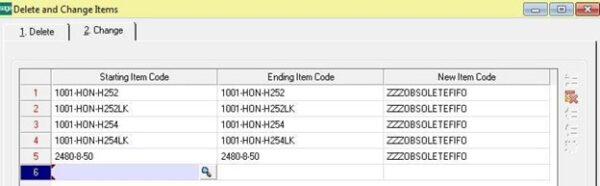
First, click on the “Change” tab. Here, enter the item to merge as BOTH the “Starting Item” AND “Ending Item.”
The number one mistake is not selecting the same Ending Item. If you make a different selection, the utility will incorporate a range of items to be merged into the new code. In the example below, we are merging into an item that starts with “ZZZ,” so it appears at the bottom of the item list. Also, the valuation of FIFO in the code indicates we will be merging all FIFO items.
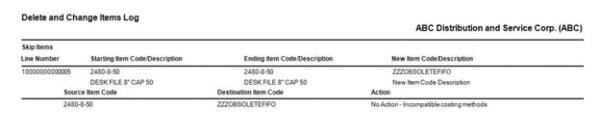
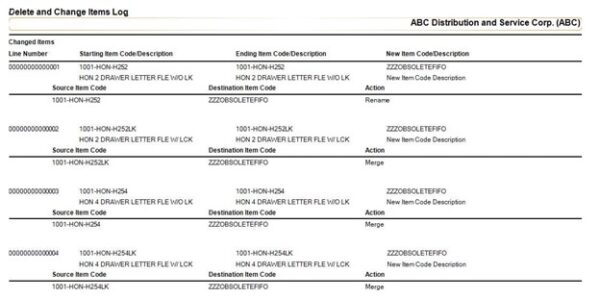
Click “Proceed.” Then, you will receive a report listing items that can be merged successfully, along with those with issues that prevent them from being merged.
Using Visual Integrator
Often customers have a great deal of items that need to be removed. Rather than hand keying each one, individually, a Visual Integrator import job can be written to bring items from an Excel spreadsheet into the utility. This is very useful to quickly first get items into the test company, then a second time into the live company.
Back-Up Again
After running a successful Merge in the test company, make a full back-up of the live company and run the process there. Keep in mind there is no “UNDO” button with this tool, so the back-up is the only option if the process does not run as expected.
Find More Sage 100 Pro Tips & Resources